Record Voice Sound in C#
Record Voice Sound in C#
Outline: Record Voice Sound
This tutorial aims at assisting us in creating a program that records voice and also plays what is recorded using the C# programming language. You will find a step-by-step guide below;
1 – We start by creating a Windows Form Application in other to carry out this tutorial by following the strides in Microsoft Visual Studio:
– Navigate to File
– Click on New Project
– Select Windows Application and name your program microphone.
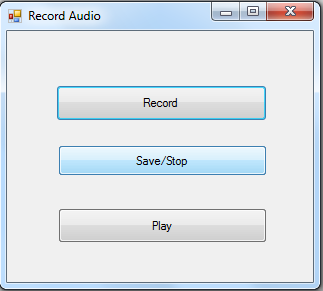
2 – Now, include 3-catches, which you can name as:
– Button1; this will serve as a record button for recording voice.
– Button2; which can act as the spare and stop catch.
– Button3; will be used for playing recorded sound.
The below image will give you a visual of how to design your interface.
3 – Next, Import System.Runtime.InteropServices namespace.
					using System.Diagnostics;
using System;
using System.Windows.Forms;
using System.Collections;
using System.Drawing;
using System.Data;
using System.Collections.Generic;


using System.Runtime.InteropServices;
4 – In the code module, create a function named record that will access the winmm.dll.
					[DllImport("winmm.dll",EntryPoint="mciSendStringA", ExactSpelling=true, CharSet=CharSet.Ansi, SetLastError=true)]

 private static extern int record(string lpstrCommand, string lpstrReturnString, int uReturnLength, int hwndCallback);
5 – Use this code below for Button1 which serves as the record button.
					public void Button1_Click(System.Object sender, System.EventArgs e)
       {
           record("open new Type waveaudio Alias recsound", "", 0, 0);

           record("record recsound", "", 0, 0);
       }
The wav audio file named recsound can be opened by calling the function named record. Which enables the recording of sound when the record button is clicked. Ensure you provide a headset with a microphone or speaker for your computer to use in saying words to be recorded.
6 – Use this code below for Button2 which serves as the save and stop button.
					public void Button2_Click(System.Object sender, System.EventArgs e)
    {
        record("save recsound c:\\mic.wav", "", 0, 0);

        record("close recsound", "", 0, 0);
    }
The rec-sound assumed name that we instated in the record button was called here. This button will save the recorded audio file and store it in the C directory and will name it mic.wav by default. We can close the recorded sound after saving.
7 – Use this code below for the play button for Button3.
					public void Button3_Click(System.Object sender, System.EventArgs e)
        {
            (new Microsoft.VisualBasic.Devices.Audio()).Play("c:\\mic.wav");
        }
We utilized the Play function in Audio to play the saved file in C Directory, the mic.wav, where we recorded its sound earlier.
Click the first record, say the words you need to say, click the save button, and execute it.
Recommended Tutorial: Display Running Time in JavaScript FREE