Radio Button Control in C#
Radio Button Control in C#
Details: Radio Button Control in C#
Radio button control is one of the most common user interface controls used in apps and websites. They are simple and flexible controls that you can programmatically disable to prevent users from selecting anything other as the default option. In this introductory chapter, we will look at radio buttons in depth.
Radio buttons are frequently used in apps to allow users to select only one or a few options from a group of alternatives. Choosing any other option will disable the control and prevent the user from navigating your app’s interface anymore. To make users understand this clearly, you should give them control with a name that translates to “radio button” in their language. For example, in English, it would be “radio button,” while in German it would be “Radiomonitore.” The name you choose should be easy for your users to understand and should convey the meaning of the control without adding unnecessary complexity.
The Radio Button functionality enables you to ask a user to select a choice from a list of options. Only one option can be selected from a group at a given time. We will look at creating a Radio Button that changes the background color when an option is selected.
Guide: Radio Button Control in C#
1. Firstly, we will open a Window Form Application in C# by using Microsoft Studio 2019;
– Navigate to File
– Click on New Project
– Select Windows Application.
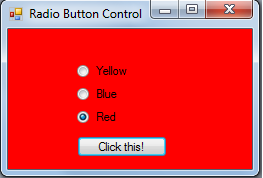
2. We can then add 3 radio buttons;
– RadionButton1 labelled as Yellow.
– RadioButton2 labelled as Blue.
– RadioButton3 labelled as Red
Your interface should look like the image below.

3. Insert the below code in Button1_Click. This will display the output of changing the color of our form when choosing the preferred color in Radio Buttons.
					private void Button1_Click(System.Object sender, System.EventArgs e)
{
    if (RadioButton1.Checked == true)
    {
        this.BackColor = Color.Yellow;
        return;
    }
    else if (RadioButton2.Checked == true)
    {
        this.BackColor = Color.Blue;
        return;
    }
    else
    {
        this.BackColor = Color.Red;
    }
}
We utilize the if-else statement to enable us to choose from the available options. RadioButton1 labelled Yellow, RadioButton2 labelled Blue, and RadioButton3 labelled Red. The checked = true is our event for our Radio Button as it toggles on and off.
RadioButton1 when checked, will have a background color of Yellow (this.BackColor = Color.Yellow). The “this” here indicates that we are referring to Form1. Next, RadioButton2 when checked will have a background color of Blue (this.BackColor = Color.Blue), this goes continually.
Output: Radio Button Control in C#